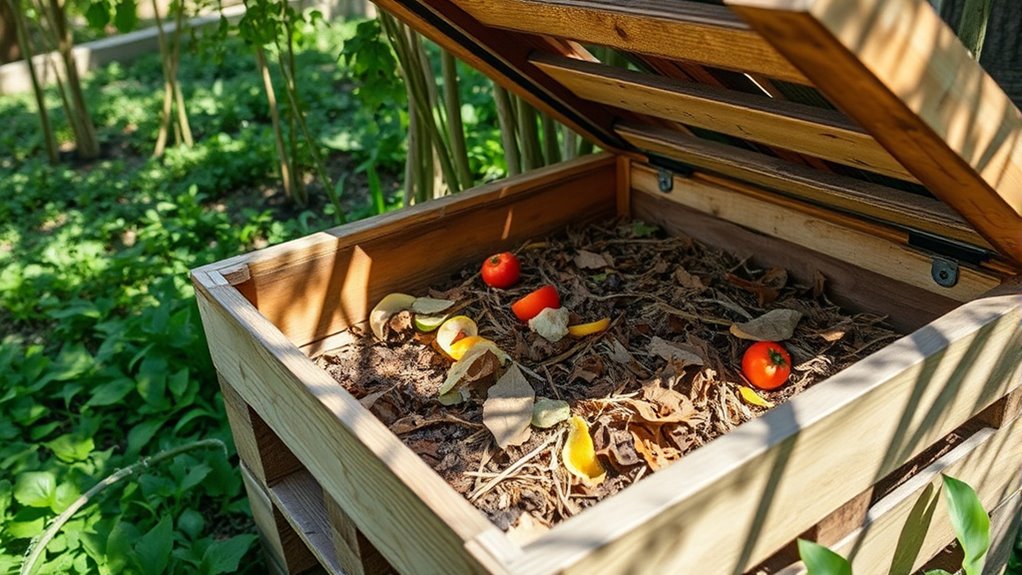
You can create a free compost bin using household items like plastic cans, nut containers, or old buckets. Drill small holes for airflow, make certain the container is pest-proof, and layer kitchen scraps with browns like leaves or shredded paper. Keep moisture like a damp sponge, turn the compost regularly, and cover to control odors and pests. If you want simple, cost-effective tips to turn scraps into garden gold, explore more on how to set up and maintain your bin.
Key Takeaways
- Repurpose household containers like plastic cans or buckets as inexpensive, DIY compost bins.
- Drill small holes around the sides and lid to ensure proper ventilation and odor control.
- Balance green kitchen scraps with brown materials such as leaves or shredded paper for efficient composting.
- Cover fresh scraps with browns to prevent pests and maintain moisture levels.
- Regularly turn and monitor the compost for proper decomposition and minimal odors.
Choosing the Right Container for Your Composting Needs

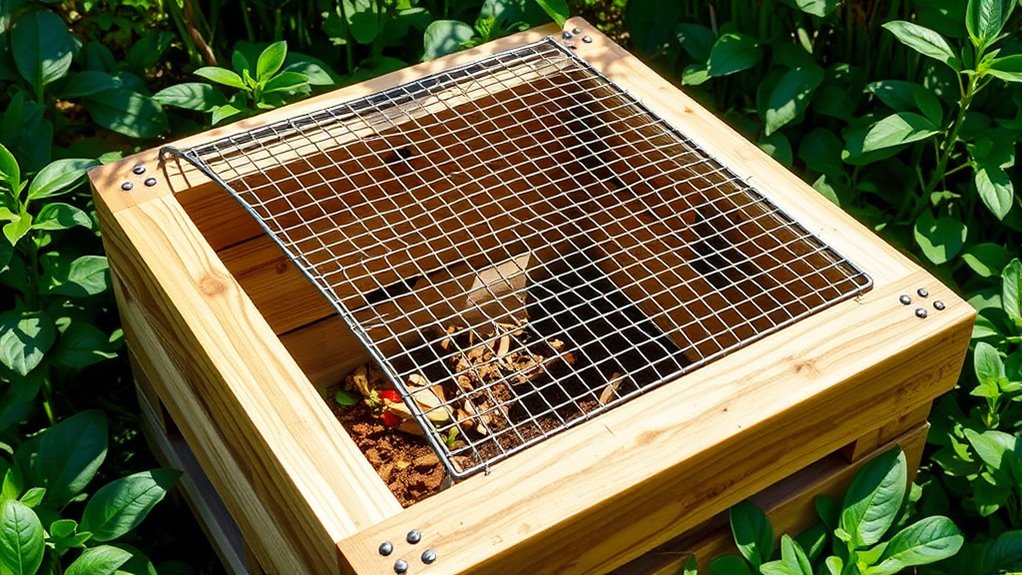
Selecting the right container is essential for effective composting, especially if you’re working with a limited budget or space. You can repurpose everyday items like empty plastic coffee cans with resealable lids or plastic nut containers, which are both inexpensive and readily available. Five-gallon buckets serve as excellent interim storage before moving scraps to a larger outdoor pile. Used irrigation valve covers from hardware stores make sturdy in-ground compost bins. You can also build customized containers from wire, wood, or cinder blocks for a low-cost, versatile setup. When choosing your container, verify it’s pest-proof with no large gaps, and consider adding a lid for moisture control. This way, you’ll create an effective environment for composting without breaking the bank or needing extra space. Incorporating prioritizing task management techniques can help you stay organized and motivated as you manage your composting project. Additionally, understanding composting best practices can optimize decomposition and reduce odors over time. Proper ventilation is also crucial to maintain aeration and prevent foul smells, ensuring a healthier composting process. Using natural techniques such as cover crops and organic fertilizers can further improve compost quality and soil health in your gardening efforts. Remember that selecting the right container material can significantly impact the efficiency and odor control of your compost bin.
Crafting an Effective Ventilation System to Control Odors
To keep odors in check, you need to place holes carefully in your compost bin, ensuring proper air circulation without attracting pests. Using odor-absorbing materials like charcoal filters can help, but they need regular replacement to stay effective. Keep an eye on filter maintenance and make sure your ventilation holes are correctly positioned for ideal odor control. Proper storage techniques for the filters can extend their effectiveness and minimize maintenance. Additionally, choosing a ventilation system with adjustable airflow can help tailor odor management to your specific composting needs. Incorporating advanced filtration technologies can further improve odor control and air quality around your compost area. Considering the role of automation in managing compost systems can also help optimize airflow and reduce manual adjustments. Regularly monitoring performance cookies related to your compost setup can provide insights into how well your system manages odors and airflow.
Proper Hole Placement
Proper hole placement is essential for creating an effective ventilation system that keeps odors in check. You should drill multiple small holes—about 1/4 inch in diameter—around the sides and lid of your compost bin. Position these holes evenly to promote consistent airflow, which accelerates decomposition and prevents unpleasant smells. Place holes near the top of the sides as hot gases tend to rise, and add some near the bottom to allow fresh air in. Avoid creating large openings to prevent pests from entering. If using a lid, drill a few holes in it, ensuring they’re spaced to maximize ventilation without compromising bin integrity. Properly placed holes help air circulate, reduce moisture buildup, and keep odors contained, making your composting experience cleaner and more odor-free. Regularly assessing and adjusting ventilation strategies can further improve odor control and compost quality, especially when considering airflow management techniques. Additionally, selecting appropriate drainage and aeration components can enhance overall compost health. Incorporating proper maintenance practices will also ensure your compost bin functions efficiently over time. Regular monitoring of moisture levels and temperature control can further optimize the composting process for better results.
Odor-Absorbing Materials
Using odor-absorbing materials is an effective way to keep your compost bin smelling fresh, especially when combined with proper ventilation. These materials help neutralize smells and prevent pests from being attracted to your bin. You can use simple, inexpensive items to achieve this:
- Charcoal filters from pet supply stores, hot-glued to lid openings, absorb odors effectively and can be replaced every few months.
- Newspaper or shredded paper at the bottom of the bin absorbs moisture and acts as a natural filter.
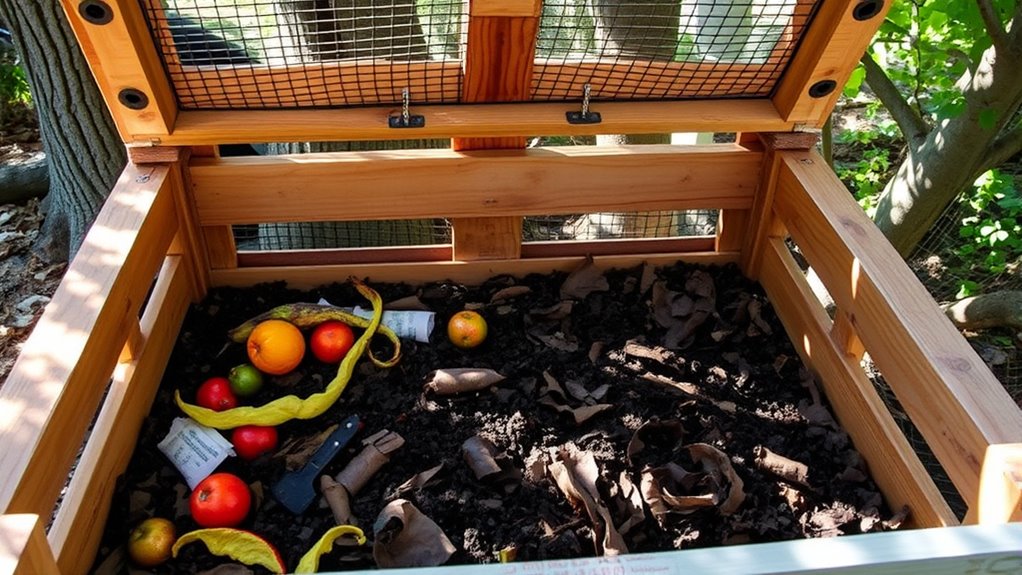
- Covering compost with a layer of browns like leaves or straw helps balance green materials and reduces odor buildup.
- Incorporating active listening techniques when managing your compost can help you better understand and address odor issues promptly. Additionally, understanding the keto diet principles can inspire you to include nutrient-rich kitchen scraps, such as vegetable peels and coffee grounds, which decompose efficiently and contribute to compost health.
- Proper ventilation is crucial for maintaining aerobic conditions, which help reduce odors and speed up composting.
Filter Maintenance Tips
A well-maintained ventilation system is essential for controlling odors in your compost bin. To keep it functioning effectively, regularly inspect your filters, especially charcoal ones, and replace them every few months. When replacing, gently remove the old filter and clean any debris from the lid or vent holes. Ensure that the holes drilled for air circulation remain unobstructed; clear any buildup of dirt or debris. If you notice persistent odors, double-check that your charcoal filter is still effective—soaked or clogged filters lose their odor-absorbing power. Keep the lid sealed tightly to prevent pests and odors from escaping. Proper maintenance of your ventilation system guarantees your compost bin stays odor-free, encouraging healthy decomposition and a more pleasant composting experience. Additionally, integrating a home air quality system can further help manage odors and improve overall indoor air freshness. Regularly monitoring and maintaining your ventilation system ensures optimal performance and odor control. For optimal results, consider filter maintenance routines as part of your composting process to prolong filter lifespan and maintain effectiveness.
Selecting and Preparing Materials to Maximize Decomposition
You should focus on balancing green and brown materials to promote efficient breakdown. Properly preparing your scraps—such as shredding paper or breaking up larger items—helps speed up decomposition. By managing moisture and ensuring the right mix, you’ll create an ideal environment for your compost to thrive.
Balance Green and Brown
Achieving ideal composting relies on maintaining the right balance between green and brown materials, which accelerates decomposition and prevents odors. You want enough greens—kitchen scraps like fruit peels, coffee grounds, and vegetable trimmings—to provide nitrogen. Browns—dried leaves, shredded cardboard, and straw—offer carbon to balance the mix. To optimize, consider these tips:
- Aim for a ratio of 1 part greens to 2-3 parts browns.
- Chop or shred materials to increase surface area and speed up breakdown.
- Layer greens and browns to create a balanced, aerated environment.
- Regularly turning the compost helps maintain oxygen levels and promotes a healthy decomposition process.
Proper Material Preparation
Proper material preparation is essential for maximizing decomposition in your compost bin. First, select materials that break down quickly, like fruit and vegetable scraps, eggshells, and coffee grounds. Chop or tear larger items to increase surface area, speeding up the process. Balance greens and browns—greens provide nitrogen, while browns supply carbon—by layering food scraps with shredded paper or leaves. Rinse food scraps to reduce pests and odors, but avoid washing away nutrients. Confirm containers have enough ventilation by drilling holes in lids or sides to promote airflow. Cover fresh additions with brown materials to prevent pests and moisture loss. Keep your compost moist but not soggy. Regularly turning or mixing the contents helps aerate the pile, ensuring consistent decomposition and rich, healthy compost.
Managing Pests and Preventing Unwanted Visitors

Keeping pests and unwanted visitors out of your compost bin is essential for maintaining an efficient and odor-free system. To do this, verify your bin is well-sealed with no gaps larger than ¼ inch. Use lids with drilled holes for proper ventilation while preventing rodents from entering. Incorporate these strategies:
Seal your compost bin tightly and add ventilation to keep pests out and odors in check.
- Install a tight-fitting lid with a charcoal filter to reduce odor and deter pests
- Avoid adding meat, dairy, or greasy foods, which attract rodents and insects
- Cover fresh scraps with brown materials like shredded paper or leaves to hide smells and discourage scavengers
- Ensuring proper airflow and ventilation can help prevent the buildup of odors that attract pests. Additionally, selecting pest-resistant compost bins made from durable, sealed materials can further reduce intrusion risks. Using a compost bin with a sealed lid can significantly decrease the likelihood of pests gaining entry. Regularly turn your compost to aerate it, which helps control odors and pests. Keep the bin clean and dry around the base, and promptly remove any fallen debris or uneaten scraps.
Maintaining Your Compost Bin for Optimal Results

Regularly monitoring and adjusting your compost bin guarantees it stays active and produces high-quality soil. Check moisture levels frequently—your compost should feel like a damp sponge. Turn or mix the contents weekly to aerate and speed up decomposition. Keep the balance of greens and browns, aiming for a 1:2 or 1:3 ratio. If it smells sour or sour, add more browns; if it’s too dry, sprinkle water. Use the table below for quick reference:
| Action | Purpose |
|---|---|
| Turning contents weekly | Aerates and accelerates decay |
| Adjusting moisture levels | Maintains ideal microbial activity |
| Balancing greens and browns | Prevents odor and pests |
| Covering with a lid or filter | Controls odor and pests |
Consistent maintenance ensures your compost stays active, odor-free, and transforms kitchen scraps into garden gold.
Transferring and Using Your Finished Compost in the Garden
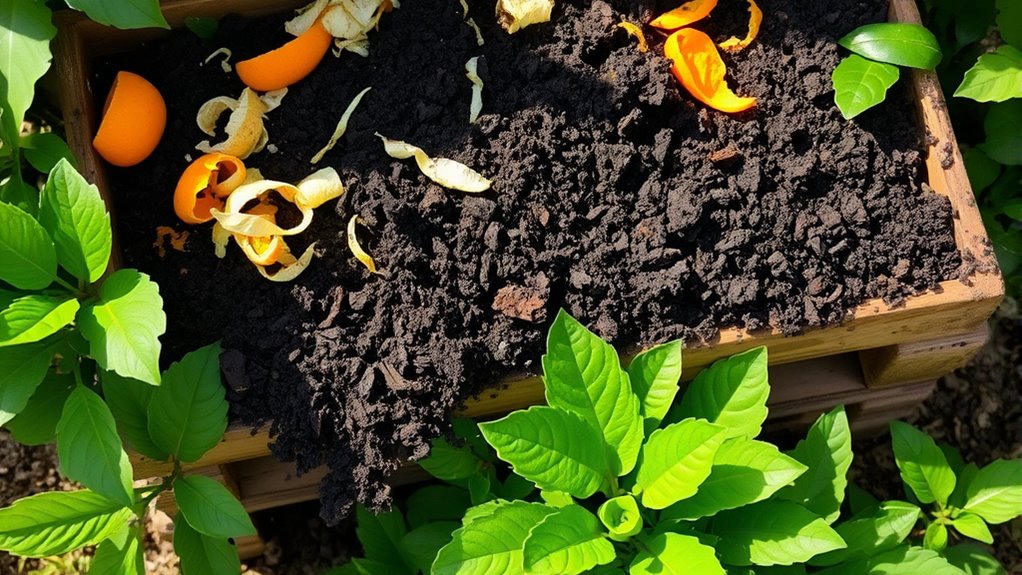
Once your compost has fully broken down and has a soil-like consistency, it’s time to transfer it to your garden. Use a shovel or hand tools to carefully move the finished compost from your bin or pile. Spread it evenly over garden beds or mix it into existing soil to enrich nutrient content. To make the process easier, consider these tips:
Once compost is soil-like, spread or mix it into your garden to enrich your soil.
- Sift the compost to remove any large, undecomposed materials for a finer texture
- Apply a layer of compost around plants as a mulch to conserve moisture and suppress weeds
- Incorporate compost into planting holes for seedlings to promote healthy root development
Cost-Effective Tips for Setting Up and Maintaining Your Bin
Setting up your compost bin doesn’t have to be costly or complicated. Use free or inexpensive containers like discarded coffee cans, plastic nut jars, or five-gallon buckets. Drill 10 or more holes in the lid for ventilation, and attach charcoal filters from pet stores with hot glue to control odors. Line the bottom with shredded newspaper to absorb moisture. Keep your kitchen scraps in the bucket, transferring them every two to three days to prevent odors and pests. Cover scraps with brown materials like shredded cardboard or leaves to maintain the right carbon-to-nitrogen balance. Regularly turn or mix the compost to promote decomposition. Replace charcoal filters every few months, and dig small holes in your yard for in-ground composting. These simple tips keep your setup affordable and effective.
Frequently Asked Questions
How Often Should I Turn or Aerate My Compost Bin?
You should turn or aerate your compost bin every 3 to 7 days. This promotes airflow, speeds up decomposition, and prevents odors. Use a garden fork or a stirring tool to mix the materials thoroughly, especially if you notice it’s getting compacted or smelling bad. Regular turning helps maintain a healthy balance of greens and browns, ensuring your compost breaks down efficiently into rich, usable soil for your garden.
Can I Compost Yard Waste Alongside Kitchen Scraps?
Yes, you can compost yard waste alongside kitchen scraps. Just make sure to balance greens like food scraps with browns such as leaves, twigs, or shredded cardboard. Maintain a ratio of two to three parts browns to one part greens to keep the compost healthy and odor-free. Chopping or shredding yard waste speeds up decomposition, and turning the pile regularly helps aerate everything for efficient composting.
What Temperature Should My Compost Reach for Optimal Decomposition?
You should aim for your compost to reach between 135°F and 160°F (57°C to 71°C) for ideal decomposition. At this temperature, harmful pathogens and weed seeds are eliminated, and microbial activity speeds up. To maintain this heat, guarantee proper aeration by drilling holes in your container lids, turn the pile regularly, and balance greens and browns. Monitoring with a compost thermometer helps you keep the right temperature.
How Do I Know When My Compost Is Fully Finished?
Your compost is finished when it looks like rich, dark soil—like a chocolate cake ready to be sliced. You’ll notice most materials have broken down, and it no longer smells or looks like kitchen scraps. Use a garden fork to check for a crumbly texture and earthy smell. When it’s uniform, moist, and free of recognizable bits, it’s time to harvest and spread your garden gold!
Are There Safety Precautions for Handling Composting Materials?
You should always wear gloves when handling composting materials to protect your skin from bacteria and any potential contaminants. Keep your hands away from your face during the process, and wash thoroughly afterward. Use tools like a trowel or scoop to avoid direct contact. Avoid composting meat, dairy, or greasy foods, as they can attract pests and create health hazards. Regularly check for mold or foul odors, which indicate problems.
Conclusion
With a DIY compost bin, you turn kitchen scraps into garden gold without breaking the bank. Think of it as planting the seeds of sustainability right in your backyard. By choosing the right container, controlling odors, and managing materials, you’ll create a thriving compost that nourishes your plants. It’s a simple, cost-effective way to make every scrap count—like turning trash into treasure and watching your garden flourish.