
TL;DR
Placing your rig in a closet can drastically reduce noise and improve sound quality, but only if you handle airflow, sealing gaps, and treat reflections properly. Strategic placement beats buying foam every time, and layering treatments is key.
If you think a closet is just a cramped, echoey box, think again. With a few clever tweaks, it can become your secret weapon for quiet, professional-sounding recordings or a nearly silent AI workstation.
Most people focus on adding foam or absorbing reflections, but the real game-changer is where you place your rig and how you handle airflow and leaks. This guide breaks down the best ways to turn that tiny space into a sound-smart, heat-managed haven.
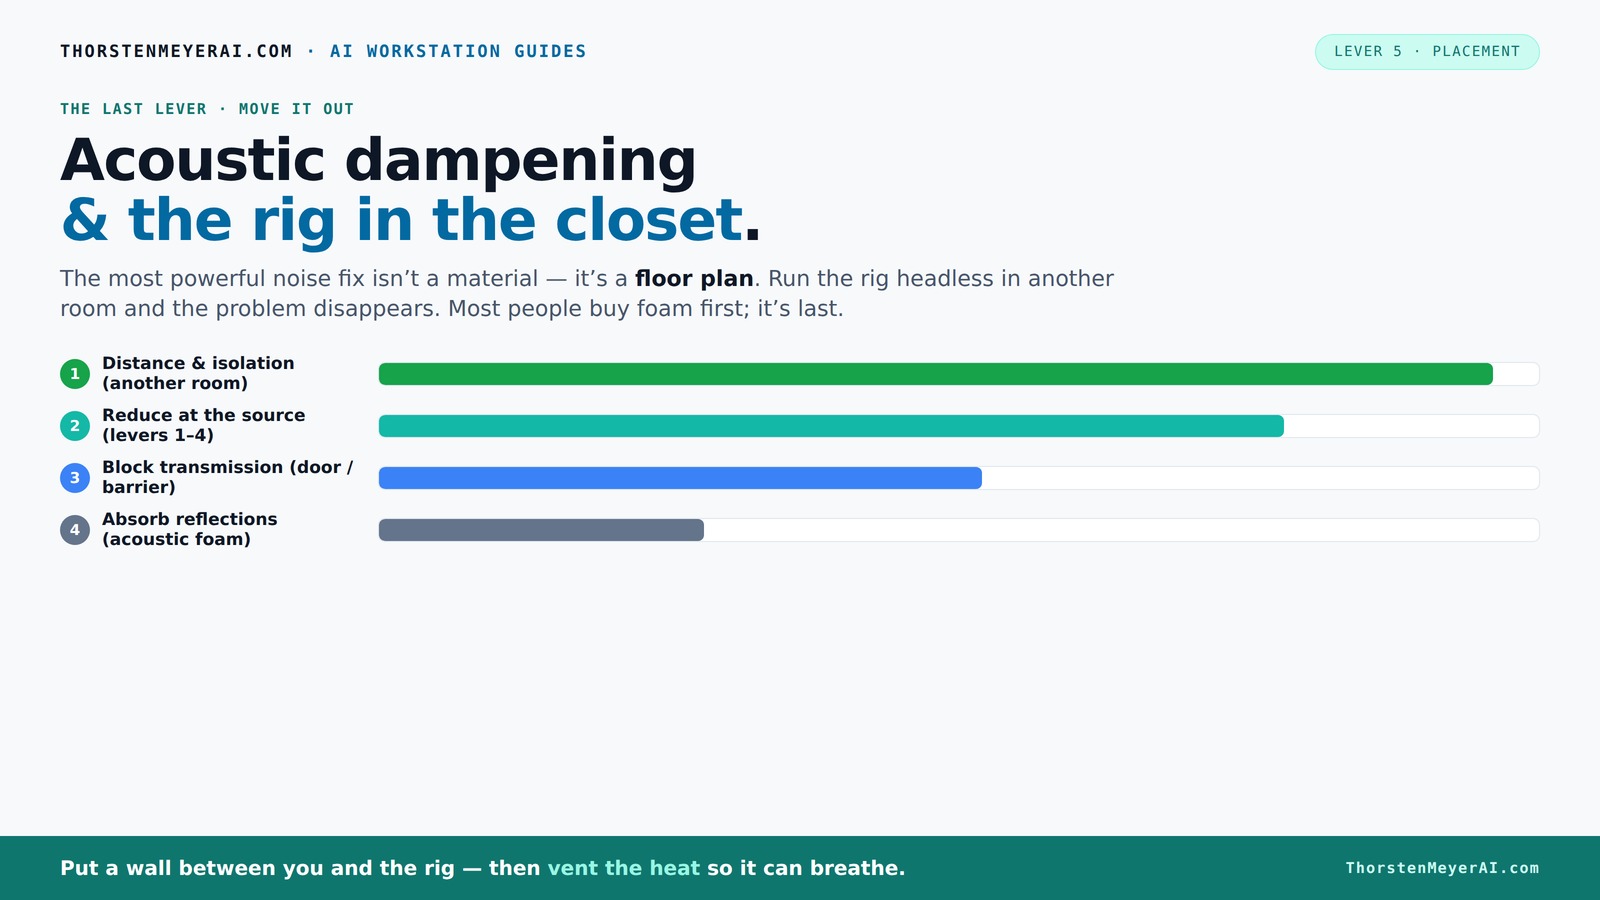
Acoustic dampening
& the rig in the closet.
The most powerful noise fix isn’t a material — it’s a floor plan. A rig you can’t hear because it’s in another room beats any amount of foam. Tap the approaches in Part 1 to see what actually works.
(another room)
(levers 1–4)
(door / barrier)
(acoustic foam)
Contain the noise, not the heat
Key Takeaways
- Prioritize placement and sealing over buying foam—distance and gaps matter most.
- Treat reflection points—wall behind mic, ceiling, and side walls—before focusing on corners.
- Always seal gaps around the door with weatherstripping or blankets for significant noise reduction.
- Use thick, layered absorbent materials to control reflections and low-end issues.
- A closet can become a quiet, effective studio or rig space with proper ventilation and treatment.
acoustic foam panels
As an affiliate, we earn on qualifying purchases.
As an affiliate, we earn on qualifying purchases.
Why a Closet Can Be Better Than a Fancy Studio Setup
A closet is naturally small, enclosed, and often filled with soft materials like clothes and blankets, which absorb sound. It’s like a ready-made vocal booth or quiet corner for your AI rig.
Imagine recording vocals in a closet. The sound is tight, reflections are minimized, and background noise from the outside can be almost eliminated if you seal gaps properly. For an AI workstation, a closet can keep noise out of your workspace while still allowing easy access to hardware.
But don’t forget—small spaces can also trap low frequencies, creating boomy, muddy sound if not treated right. The challenge is that low frequencies are harder to absorb because they require more mass or specific treatments, which can sometimes lead to tradeoffs between space, cost, and effectiveness. Understanding this helps you prioritize which treatments to add and where to focus your efforts for the most balanced sound.
soundproofing door seal kit
As an affiliate, we earn on qualifying purchases.
As an affiliate, we earn on qualifying purchases.
Acoustic Dampening vs. Soundproofing: What’s the Real Deal?
Acoustic dampening is about controlling reflections inside your space—making sound softer and less echoey. Soundproofing stops sound from leaking out or coming in.
For your closet, dampening means adding blankets, foam, or rugs to absorb sound. Soundproofing is sealing gaps, adding mass to walls, or installing barriers to block noise transmission. The key difference is that dampening improves how the sound behaves inside the space, reducing echo and reverb, which is crucial for clear recordings. Soundproofing, on the other hand, prevents external noise from contaminating your recordings or your noise from disturbing neighbors, which often requires more extensive modifications and can be more costly.
To make your closet more effective practically, start by applying internal dampening treatments like foam panels or blankets to reduce reflections. Then, focus on sealing gaps around the door and any leaks with weatherstripping or acoustic seals. This layered approach ensures internal sound clarity while minimizing external noise intrusion. Remember, a combination of internal dampening and external sealing provides the best results without the need for professional soundproofing.
airflow management fan
As an affiliate, we earn on qualifying purchases.
As an affiliate, we earn on qualifying purchases.
Where to Place Treatment for Peak Sound Control in a Closet
Start with the reflection points: the wall behind your mic, the ceiling above, and the side walls close to your recording position. These spots bounce sound back and forth, creating boxy, harsh vocals. Addressing these reflection points is critical because they directly affect the clarity and naturalness of your recordings. When sound reflects off surfaces near your microphone, it can cause comb filtering and phase issues, resulting in a thin or hollow sound. By placing absorptive materials at these points, you effectively remove the early reflections that color your sound.
Use acoustic panels or blankets at these key spots. For low-frequency buildup, add bass traps in corners. A good rule: treat the first reflection points before anything else. This targeted approach ensures you’re not wasting resources on areas that have less impact on sound quality. For example, mounting a thick blanket or foam panel on the ceiling directly above your mic can significantly reduce reverb and flutter echoes, making your voice clearer and more natural. To maximize efficiency, check reflection points with a mirror or listen for echoes, then place treatments precisely. Regularly listen and adjust to avoid deadening the sound excessively. This practical, step-by-step placement makes a noticeable difference in clarity.
closet studio setup accessories
As an affiliate, we earn on qualifying purchases.
As an affiliate, we earn on qualifying purchases.
How to Deal with the Closet Door and Gaps
The door is often the weakest link in sound containment. It’s a giant hole for sound to escape or enter, and neglecting it can undermine all your efforts.
Best fix? Seal gaps with weatherstripping or acoustic seals. Use thick blankets or specially designed door seals to block sound leaks. For instance, hanging a heavy moving blanket over the door can reduce sound escape by 20-30 dB, but the effectiveness depends on sealing all gaps—around hinges, handles, and edges—with weatherstripping or acoustic caulk. For added insulation, you can install a door sweep or threshold seal at the bottom. To optimize, measure gaps with a flashlight or listen for leaks, then seal thoroughly. This step is crucial because even small cracks can significantly reduce your room’s sound isolation. The practical takeaway: ensure every gap is sealed, and use layered solutions like blankets plus seals for maximum noise containment—this makes your setup much more effective and manageable.
How Thick Should Your Absorptive Materials Be?
For effective sound absorption, materials should be at least 2 inches thick. Thicker panels or blankets absorb more low frequencies and reduce echo better. The reason is that low frequencies have longer wavelengths and require more mass or depth to attenuate effectively. For example, a 4-inch thick rockwool panel can absorb bass frequencies that thinner foam struggles with, leading to a more balanced sound.
To implement this practically, choose materials like mineral wool, thick foam, or layered blankets that are at least 2 inches thick. Place these on walls, ceiling, and door areas, focusing on reflection points and corners. When space allows, opt for 4-inch or layered treatments to better tame bass buildup. Remember, layering multiple thinner materials can sometimes outperform a single thick panel, offering flexibility and better low-frequency control without sacrificing too much space. Measure your space and prioritize thicker or layered treatments in areas where low-end issues persist. This practical approach ensures you get the most bang for your buck in sound absorption.
Should You Add Bass Traps in a Closet? Yes or No?
Bass traps are specialized absorbers designed for low frequencies—crucial in small, enclosed spaces like closets. They work by dampening standing waves and low-end resonances. that can make recordings sound boomy or muddy. If your recordings have a boxy or boomy quality, installing foam bass traps in the corners can significantly improve clarity. For example, placing bass traps in the closet corners helps flatten out standing waves that amplify low frequencies, resulting in a tighter, more controlled sound. While technically optional, bass traps are a smart investment when dealing with low-end issues, especially in small spaces where low frequencies tend to build up quickly. The tradeoff is cost and space—bass traps can be bulky and pricey, but their impact on sound quality is often worth it. Ignoring low-frequency treatment can leave your recordings with a muddy or uneven bass response, which is hard to fix later.
Practical decision-making: if your recordings sound muddy or boomy, add bass traps in the corners. If you notice no low-frequency issues, you can prioritize other treatments first. Use your ears and measurement tools to identify low-end problems before investing in traps, ensuring your efforts are targeted and cost-effective.
Best Microphones for a Tiny Closet Booth
Small spaces favor microphones that reject room noise and minimize reflections. Dynamic mics like the Shure SM58 or SM7B excel because they focus on your voice and ignore the room. These microphones have a limited pickup pattern, which means they primarily capture sound from directly in front of them and reject sound from the sides and rear, reducing the impact of reflections and ambient noise. Condenser mics, while more sensitive and capable of capturing detailed sound, tend to pick up more room sound unless the space is thoroughly treated. Therefore, in untreated closets, a dynamic mic is often the best choice to ensure cleaner recordings. Proper positioning—close to your mouth—and using a pop filter further enhance sound quality. The tradeoff is that dynamic mics might sound less detailed than condensers, but in a small untreated space, they often produce better results overall.
Common Mistakes That Sabotage Your Closet Soundproofing
Ignoring the door, relying solely on foam, and not sealing gaps are the biggest pitfalls. These oversights can make all your effort ineffective because sound leaks through unsealed gaps or reflective surfaces remain untreated. For example, a user reports that after adding foam but leaving gaps around the door, sound still leaks out, ruining recordings. Sealing every crack and adding extra layers to the door significantly improves isolation. Another mistake? Over-treating only the corners while neglecting the reflective surfaces nearby. This can create an unbalanced sound and reduce the overall effectiveness of your treatment. A layered, holistic approach—addressing reflections, leaks, and low-frequency issues—is essential for a truly quiet and clean setup. The practical takeaway: neglecting these details wastes effort and money. Instead, systematically seal gaps, treat reflection points, and layer materials for maximum impact.
How to Reduce Reflection and Echo from Surfaces in a Small Space
Use blankets, rugs, or foam panels on desks, walls, and ceilings to dampen harsh reflections. The goal is to prevent sound waves from bouncing directly back into the mic, which causes echo and muddiness. For example, laying a thick blanket on the desk surface near the mic prevents sound bouncing back into the mic, making vocals clearer. Similarly, adding absorption to the ceiling and side walls can significantly reduce flutter echoes and reverberation that make recordings sound unnatural. To maximize effectiveness, identify the main reflection points using a mirror or listening test, then place treatments precisely at those spots. Adjust and listen repeatedly to find the right balance—over-treating can deaden the space too much. Practical, targeted placement of absorption materials yields clearer, more natural recordings without sacrificing liveliness.
Budget vs. Professional Studio Solutions for Closet Sound Control
Simple DIY materials—blankets, rugs, foam panels—can be surprisingly effective. They’re cheap, versatile, and easy to move around. These solutions are ideal for those starting out or working within a tight budget, providing a noticeable improvement in sound clarity and noise reduction. To get the most out of these, focus on covering reflection points, sealing gaps, and layering materials. For more serious noise isolation, consider investing in purpose-built solutions like soundproof cabinets or ventilation systems. These options can cost hundreds or thousands but deliver higher noise reduction—up to 60 dB or more—turning a closet into a near professional-quality studio. Practical decision: start with DIY treatments, then upgrade as needed based on your noise issues and budget constraints. Regular testing with a sound level meter or simple listening helps you decide when an upgrade is justified, ensuring your investments are targeted and effective.
Frequently Asked Questions
Can a closet really work as a vocal booth?
Absolutely. Small, enclosed spaces naturally reduce reflections and echo. With proper sealing, some treatment, and mic placement, a closet can produce professional-sounding vocals.Where should I place acoustic foam or panels first?
Start with the reflection points—behind the mic, ceiling above, and side walls close to your position. Focus on these spots before tackling corners or other surfaces.Do I need bass traps in a closet?
If your recordings sound boomy or boxy, yes. Bass traps in the corners help tame low-frequency buildup, making your sound clearer and more balanced.How do I stop sound from escaping the closet?
Seal gaps with weatherstripping, add blankets or acoustic seals around the door, and consider using a soundproof door or panel to block leaks effectively.How thick should the absorbent materials be?
Aim for at least 2 inches thick for basic absorption. Thicker layers, like 4 inches, work even better for low frequencies and reducing reverb.Conclusion
In the end, turning your closet into a sound-smart space isn’t about fancy gear alone. It’s about smart placement, sealing gaps, layering materials, and managing heat.
Think of your closet as a mini studio or AI rig hideout—quiet, controlled, and ready for prime-time. With a few tweaks, you’ll hear the difference in every recording and feel the peace when working nearby.